Pairing and connecting cell phone
 Pairing the mobile phone
To avoid becoming distracted and posing an unnecessary hazard both to your own vehicle's occupants and to other road users, only pair the mobile phone while the vehicle is stationary.
1. "Telephone".
2. "Bluetooth® (phone)".
3. "Add new phone".
The Bluetooth name of the vehicle is displayed.
4. To perform additional steps on the mobile phone, refer to the mobile phone operating instructions: e.g. search for or connect the Bluetooth device or a new device.
The Bluetooth name of the vehicle appears on the mobile phone display.
5. Select the Bluetooth name of the vehicle on the mobile phone display.
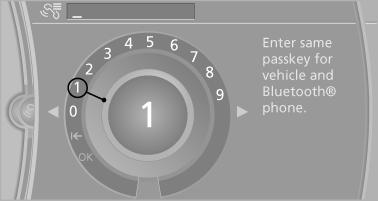
Prompt via iDrive or the mobile phone to enter the same Bluetooth passkey.
6. Enter the passkey and confirm.
7. Select the functions for which the mobile phone is to be used.
8. "OK"
If the pairing was successful, the mobile phone appears at the top of the list of mobile phones.
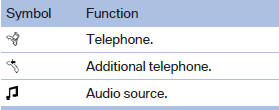
The functions supported by the mobile phone and audio device are displayed as symbols when paired.
White symbol: the function is active.
Gray symbol: the function is inactive.
Four mobile phones can be paired with the vehicle at once. Three mobile phones can be connected with the vehicle at once.
If pairing was unsuccessful: What to do if...
See also:
Condition Based Service CBS
Sensors and special algorithms take into account
the driving conditions of your vehicle.
Based on this, Condition Based Service determines
the maintenance requirements.
The system makes it possi ...
Even more entertainment at the wheel: with BMW Live and BMW Online
Subject to owning a suitable internet-compatible mobile phone and arranging a
requisite data tariff, new BMW 3-Series Sedan customers can enjoy a selection of
services from the existing BMW Online ...
Tow fitting
Tow fitting
The screw-in tow fitting should always be carried
in the vehicle. It can be screwed in at the
front or rear of the BMW. It is in the onboard vehicle
tool kit located in a storage ...