Clock
The settings are stored for the remote control currently in use, refer also to Personal Profile on page 28.
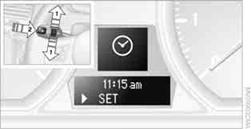
Setting the timeIn the instrument cluster
To set the 12h/24h format, refer to Setting the time format on page 77.
1. Push button 1in the turn signal/high beam lever up or down repeatedly
until the appropriate symbol appears in the display, accompanied by the time and
the word "SET".
2. Press button 2.
3. Use button 1to set the hours.
4. Press button 2to confirm the entry.
5. Use button 1to set the minutes.
6. Press button 2to confirm the entry.
7. Press button 2.
The system accepts the new time.
Via iDrive
1. Press the MENUbutton.
The main menu is displayed.
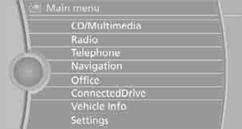
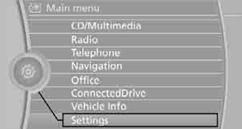
2. "Settings"
Setting the time
1. "Settings"
2. "Time/Date"
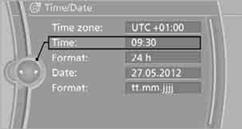
3. "Time:"
4. Turn the controller until the desired hours are displayed, and then press
the controller.
5. Turn the controller until the desired minutes are displayed, and then press
the controller.
The time is stored.
Setting the time format
1. "Settings"
2. "Time/Date"
3. "Format:"
4. Select the desired format and press the controller.
The time format is stored.
Setting time zone
1. "Settings"
2. "Time/Date"
3. "Time zone:"
4. Select desired time zone. The time zone is stored.
See also:
Camera
Camera
The lens of the rear view camera is under the
grasping lip of the tailgate.
The presence of dirt can impair image quality.
Clean the lens with a moist, nonabrasive cloth. ...
Display
Display
1 Lane departure warning
2 Active Cruise Control
3 Desired speed
4 Navigation system
5 Speed
The collision warning, Night Vision pedestrian
warning, or Check Control messages are dis ...
Notes
Do not cover lower screen edge, since this
is where the sensors and the infrared interface
are installed.
When loading the rear seats and adjusting
the backrest of the front seat, fold i ...