Head restraints
Correctly adjusted head restraint
A correctly adjusted head restraint reduces the risk of neck injury in the event of an accident.
 Adjust the head restraint in such a way that
its center is at approx. ear level. Otherwise, there is an increased risk of injury
in the event of an accident. Only remove a head restraint if no one will be sitting
on the seat in question. Reinstall the head restraint before transporting anyone
on that seat; otherwise, the passenger will be without protection from the head
restraint.
Adjust the head restraint in such a way that
its center is at approx. ear level. Otherwise, there is an increased risk of injury
in the event of an accident. Only remove a head restraint if no one will be sitting
on the seat in question. Reinstall the head restraint before transporting anyone
on that seat; otherwise, the passenger will be without protection from the head
restraint.
Height
Adjust the head restraint so that its center is approximately at ear level.
Distance
Adjust the distance so that the head restraint is as close as possible to the back of the head.
Front seatsHeight adjustment
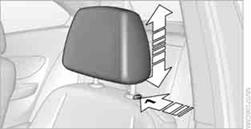
> To raise: pull up.
> To lower: press the button, arrow 1, and slide the head restraint down.
Removing
1. Pull up as far as it will go.
2. Press the button, arrow 1, and pull the head restraint all the way
out.
Coupe: height adjustment
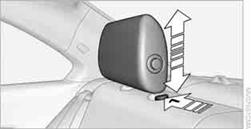
> To raise: pull up.
> To lower: press the button, arrow 1, and slide the head restraint down.
Convertible: raising and lowering
 Only lower the head restraints if there are no
passengers in the rear. Raise all lowered head restraints before transporting passengers
in the rear.
Only lower the head restraints if there are no
passengers in the rear. Raise all lowered head restraints before transporting passengers
in the rear.
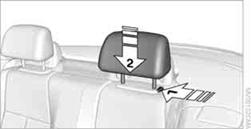
> To raise: pull up.
> To lower: press the button, arrow 1, and slide the head restraint down,
arrow 2.
Removing
1. Pull up as far as it will go.
2. Press the button, arrow 1, and pull the head restraint all the way
out.
Coupe: folding head restraint down and up
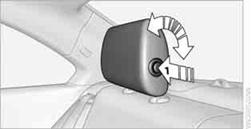
Depending on your vehicle's equipment, it may contain foldable head restraints.
Folding down:
Press the button, arrow 1.
Folding up:
Pull the head restraint.
 Only fold down the head restraints if there are
no passengers in the rear. Fold up the head restraints again before transporting
passengers in the rear.
Only fold down the head restraints if there are
no passengers in the rear. Fold up the head restraints again before transporting
passengers in the rear.
Seat with manual longitudinal adjustment
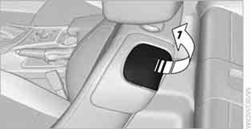
Easy entry
The easy entry feature includes a memory function for the longitudinal adjustment and backrest angle.
1. Pull lever 1and swing the backrest forward.
2. Push the seat forward.
Previous position
Push the seat backward and swing the backrest back.
When pushing the seat into its rearmost position, make sure that no one is injured and that no objects are damaged.
Before driving off, engage both seats and backrests so that they are locked in place. Otherwise, there is a risk of an accident due to unexpected movement.
Seat with electrical longitudinal adjustment
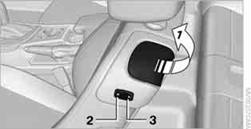
Easy entry
The easy entry feature includes a memory function for the longitudinal adjustment and backrest angle.
1. Pull lever 1and swing the backrest forward.
2. Press the front end 2of the switch until the seat has moved into
the desired position.
Previous position
Press the rear end 3of the switch until the seat automatically stops in its previous position, and fold the backrest back. If you release the switch before the previous seat position is reached, the seat will stop at its current position.
When sliding the seat backward, make sure no
one is injured and no objects are damaged.
Before driving off, engage both seats and backrests so that they are locked in place. Otherwise, there is a risk of an accident due to unexpected movement.
See also:
Setting compass zones
Set the compass zone corresponding to the vehicle's
geographic location so that the compass
Setting compass zones
Press the adjustment button for 3‑4 seconds.
The number of the compass zo ...
General information
TeleService supports communication with your
service center.
▷ Data on the vehicle's service requirements
can be sent directly to the service center. In
this way, the service center can p ...
Capacity
The ski bag can be used to transport up to three
pairs of skis with a length of up to 6 ft/2.10 m or
a snowboard of up to 5 ft/1.60 m. ...