Clock
The settings are stored for the remote control currently in use, refer also to Personal Profile on page 28.
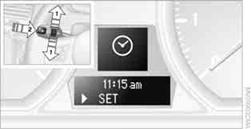
Setting the timeIn the instrument cluster
To set the 12h/24h format, refer to Setting the time format on page 77.
1. Push button 1in the turn signal/high beam lever up or down repeatedly
until the appropriate symbol appears in the display, accompanied by the time and
the word "SET".
2. Press button 2.
3. Use button 1to set the hours.
4. Press button 2to confirm the entry.
5. Use button 1to set the minutes.
6. Press button 2to confirm the entry.
7. Press button 2.
The system accepts the new time.
Via iDrive
1. Press the MENUbutton.
The main menu is displayed.
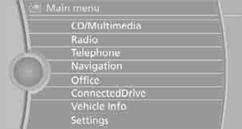
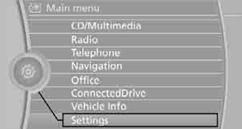
2. "Settings"
Setting the time
1. "Settings"
2. "Time/Date"
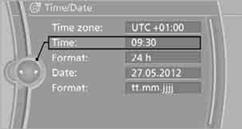
3. "Time:"
4. Turn the controller until the desired hours are displayed, and then press
the controller.
5. Turn the controller until the desired minutes are displayed, and then press
the controller.
The time is stored.
Setting the time format
1. "Settings"
2. "Time/Date"
3. "Format:"
4. Select the desired format and press the controller.
The time format is stored.
Setting time zone
1. "Settings"
2. "Time/Date"
3. "Time zone:"
4. Select desired time zone. The time zone is stored.
See also:
Opening the favorites
If an activated favorite is played back, the following
message appears for approx. 20 seconds:
"Favorite alert!".
"Favorites"
Select the symbol while the message is shown.
...
Automatic mode
The automatic engine start/stop function is operational
after each engine start.
The function is activated above a certain speed.
▷ Manual transmission: above 3 mph, approx.
5 km/h.
▷ ...
Changing the map section
"Interactive map"
▷ To shift the map: move the controller in the
required direction.
▷ To shift the map diagonally: move the controller
in the required direction and turn ...