Map view
Displaying the map view
1. "Navigation"
2. "Map"
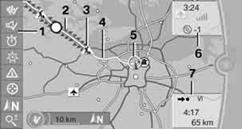
1. Toolbar
2. Route segment with traffic obstruction
3. Road sign for traffic obstruction
4. Planned route
5. Current location
6. Upper status box
7. Lower status box
Lines on the map
Streets and roads are depicted with different colors and lines according to their classification. Dotted lines represent railroad and ferry connections. National borders are depicted with thin lines.
Traffic obstructions
Small triangles along the planned route identify route segments with traffic obstructions, depending on map scale. The direction of the triangles indicates the direction of the obstruction.
Road signs classify the obstructions.
> Red road sign: the obstruction relates to the planned route or direction of
travel.
> Gray road sign: the obstruction does not relate to the planned route or direction
of travel.
Traffic bulletins.
Planned route
After route guidance is started, the planned route is displayed on the map.
Status boxes
Show/hide: press the controller.
> Upper status box: time, phone details, and entertainment details.
> Lower status box: symbol for active route guidance, traffic bulletin status, arrival
time, and distance from destination.
Toolbar
The following functions are available directly in the map view:
Changing the map section "Interactive map"
> To shift the map: move the controller in the required direction.
> To shift the map diagonally: move the controller in the required direction and
turn it.
1. Select the  symbol.
2. Turn the controller to adjust the scale.
Automatic scaling of the map
In the map view facing north, turn the controller in any direction until AUTO is displayed as the map scale.
The map shows the entire range from your location to the destination.
Settings for the map viewThe map is shown on the Control Display.
1. Open "Options".
2. "Settings"
Set the optimized map view.
> "Day/night mode"
Select and adjust depending on light conditions.
"Traffic conditions/gray map" active: Settings are not taken into account.
> "Satellite images"
Depending on the availability and resolution, satellite imagesare displayed in scales of approx. 1 mile to 600 miles/2 km to 1,000 km.
> "Perspective view in 3D"
Displays a three-dimensional view. Prominent areas that are contained in the navigation data are displayed on the map in 3D.
> "Traffic conditions/gray map"
The map is optimized for displaying traffic bulletins. Symbols for the special destinations are no longer displayed.
Map view for the split screen displayThe map view for the split screen can be selected separately from the main screen.
1. Open "Options".
2. "Split screen"
3. Move the controller to the right repeatedly until the split screen content
is selected.
4. Select "Split screen content" or scale.
5. Select the map view:
> "Arrow display"
> "Map facing north"
> "Map direction of travel"
> "Map view with perspective"
> "Position"
> "Exit ramp view"
> "Traffic conditions/gray map"
6. To change the scale: switch to the split screen and turn the controller.
See also:
Malfunctions
Steering wheel vibration
Frequent activation of the steering wheel vibration
causes the system to overheat.
This causes the lane departure warning to become
deactivated.
Let the system cool and ...
Time
Setting the time zone
1. "Settings"
2. "Time/Date"
3. "Time zone"
4. Select the desired time zone.
The time zone is stored.
Setting the time
1. "Settings" ...
Displays in the instrument cluster
Selected program
The selected program is
displayed
in the tachometer.
Program selection
Pressing the button displays a
list
of the selectable programs.
Display on the Control Display
Pr ...