Clock
The settings are stored for the remote control currently in use, refer also to Personal Profile on page 28.
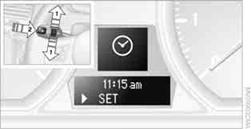
Setting the timeIn the instrument cluster
To set the 12h/24h format, refer to Setting the time format on page 77.
1. Push button 1in the turn signal/high beam lever up or down repeatedly
until the appropriate symbol appears in the display, accompanied by the time and
the word "SET".
2. Press button 2.
3. Use button 1to set the hours.
4. Press button 2to confirm the entry.
5. Use button 1to set the minutes.
6. Press button 2to confirm the entry.
7. Press button 2.
The system accepts the new time.
Via iDrive
1. Press the MENUbutton.
The main menu is displayed.
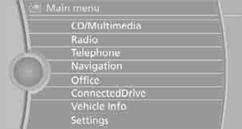
2. "Settings"
Setting the time
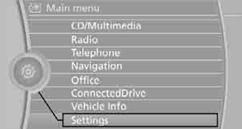
1. "Settings"
2. "Time/Date"
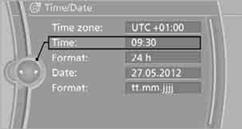
3. "Time:"
4. Turn the controller until the desired hours are displayed, and then press
the controller.
5. Turn the controller until the desired minutes are displayed, and then press
the controller.
The time is stored.
Setting the time format
1. "Settings"
2. "Time/Date"
3. "Format:"
4. Select the desired format and press the controller.
The time format is stored.
Setting time zone
1. "Settings"
2. "Time/Date"
3. "Time zone:"
4. Select desired time zone. The time zone is stored.
See also:
Switching off automatically
The system switches off and the LED goes out:
▷ After approx. 165 ft/50 m when driving forward.
▷ After approx. 22 mph/35 km/h when driving
forward.
Switch on the system again if nece ...
Pairing/unpairing the mobile
phone
General information
The following functions are available:
Use of a mobile phone as a telephone.
Use of a mobile phone as an additional telephone.
Use of a mobile phone as an audio source.
...
Car care products
BMW recommends using cleaning and care
products from BMW, since these have been
tested and approved.
Car care and cleaning products
Follow the instructions on the container.
When cleaning the ...