Tail lamps, bulb replacement
At a glance
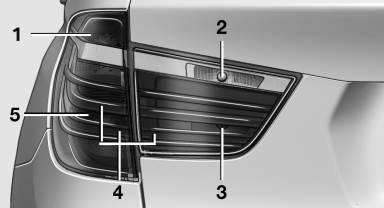
1 Turn signal
2 Backup lamp
3 Inside brake lamp
4 Tail lamp
5 Tail lamp/brake light
Turn signal, tail lamp and brake lamp
Follow the general instructions on lamps and bulbs.
21-watt bulb, P21W With an Adaptive Light Control or xenon headlamp:
tail lamp is designed with LED-technology.
Contact your service center in the event of a malfunction.
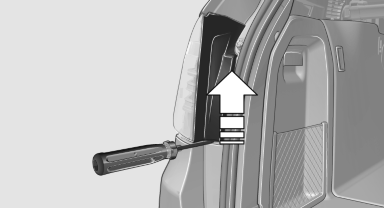
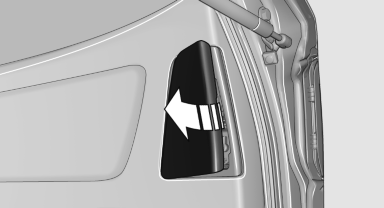
1. Open the tailgate.
2. Insert the screwdriver from the onboard vehicle
tool kit between the cover and body,
push it up, arrow, and remove the cover.
3. Release the nuts.
4. Remove the tail lamp from the body and detach
the connector.
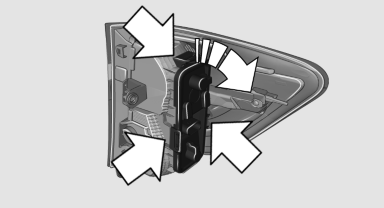
5. Release three fasteners on the bulb holder
and remove bulb holder from the tail lamp.
6. Turn the bulb and remove it. The turn signal
is the upper bulb and the tail lamp/brake
lamp is the lower bulb on the bulb holder.
7. Proceed in the reverse order to insert the
new bulb and attach the bulb holder. Make
sure that the bulb holder is engaged in all
fasteners.
8. Connect and install tail lamp.
9. Insert cover with the three mountings in the
tail lamp. While applying pressure on the top
and bottom bracket, slide the cover down to
the stop.
Backup lamp and inner brake lamp
Follow the general instructions on lamps and bulbs.
Backup lamp: 16-watt bulb, W16W
Inner brake lamp: 21-watt bulb, H21W
1. Open the tailgate.
2. Pull out the cover at the recessed grip, arrow.
3. Detach the connector.
4. Detach the bulb holder from the tail lamp.
The backup lamp is the upper lamp and the
brake lamp is the lower lamp on the bulb
holder.
5. To replace the backup lamp, pull off the bulb
carefully.
To replace the brake lamp, push the bulb
down and turn it to the left.
6. Proceed in the reverse order to insert the
new bulb and attach the bulb holder.
Ensure that the bulb holder is firmly attached.
See also:
Using contact data
At a glance
Contact data from appointments, tasks, text
messages, emails and notes can be stored or
selected.
Displaying contact or selecting phone
number
1. "Use contact data".
2. ...
Ignition on
Press the Start/Stop button, and do not press on
the brake pedal at the same time.
All vehicle systems are ready for operation.
Most of the indicator and warning lamps in the
instrument cluster ...
Coolant temperature
A warning lamp will come on if the coolant, and
therefore the engine, becomes too hot. In addition,
a message will appear on the Control Display.
Check the coolant level ...