
Tail lamps
▷ Turn signal, brake lamp: 21-watt bulb, P21W.
▷ Brake force display: 21-watt bulb, P21W.
▷ Backup lamp: 16-watt bulb, W16W
▷ Tail lamp: LED technology.
Contact your service center in the event of a malfunction.
Arrangement of tail lamps
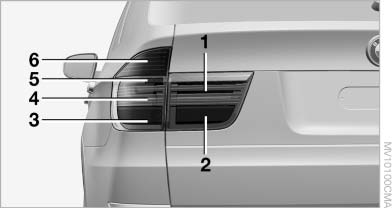
Arrangement of tail lamps
1 Tail lamp
2 Brake force display
3 Brake lamp
4 Tail lamp/side marker lamp
5 Backup lamp
6 Turn signal
Turn signals, brake lamps and backup lamps
The bulbs are integrated in a single bulb holder.
1. Open the side panel in the cargo area.
2. Remove the first aid kit and warning triangle
if necessary. Fold up the insulation.
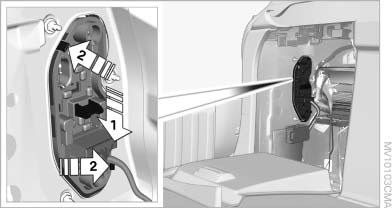
Turn signals, brake lamps and backup
lamps
3. Press the button, arrow 1, down, press the catches, arrows 2, outward slightly, and remove the bulb holder.
4. Apply gentle pressure to the P21W bulb while turning it to the left for removal and replacement.
Remove the W16W bulb and replace.
5. Re-engage the bulb holder so that it audibly clicks into place.
6. Remount the side panel.
Brake Force Display
1. Carefully remove the cover in the tailgate panel with a screwdriver.
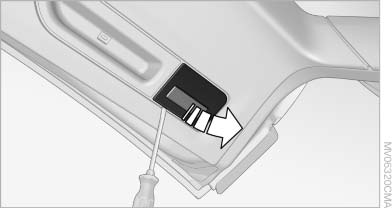
2. Push the catch on the bulb holder to the left, arrow, and remove it.
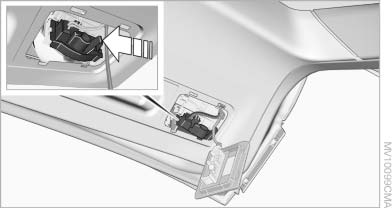
3. Apply gentle pressure to the bulb while turning it to the left for removal and replacement.
4. Re-engage the bulb holder so that it audibly clicks into place.
5. Before installing the cap, unclip the cargo area lamp.
Then lay the cap on its upper side and close it, refer to arrow.
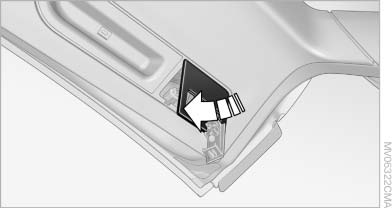
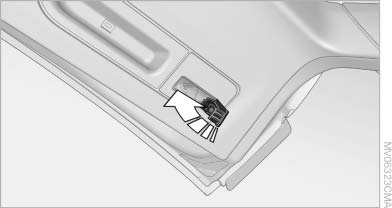
6. Position the cargo area lamp and clip it in, refer to arrow.
License plate lamps
These lamps are made using LED technology.
Contact your service center in the event of a malfunction.
Center brake lamp
This lamp uses LED technology for operation.
Contact your service center in the event of a malfunction.
See also:
The concept
The rear view camera assists you when parking
and maneuvering in reverse. To accomplish this, the region behind your vehicle
is shown on the
Control Display. ...
Deleting the button assignments
1. Press buttons 1 and 8 simultaneously for
approx. five seconds.
2. "OK" ...
Screw thread
Push out the cover by pressing on the top edge.
Front
Rear
...