Lamps and bulbs
Lamps and bulbs make an essential contribution to vehicle safety. They should, therefore, be handled carefully. BMW recommends having your BMW center perform any work that you do not feel competent to perform yourself or that is not described here.
 Never touch the glass of new bulbs with your
bare fingers, as even minute amounts of contamination will burn into the bulb's
surface and reduce its service life. Use a clean tissue, cloth or something similar,
or hold the bulb by its base.
Never touch the glass of new bulbs with your
bare fingers, as even minute amounts of contamination will burn into the bulb's
surface and reduce its service life. Use a clean tissue, cloth or something similar,
or hold the bulb by its base.
You can obtain a selection of replacement bulbs at your BMW center.
Only change bulbs while they are cool to the touch; otherwise, you could suffer burns.
 When working on electrical systems, always begin
by switching off the consumer in question; otherwise, short-circuits could result.
To avoid possible injury or equipment damage when replacing bulbs, observe any instructions
provided by the bulb manufacturer.
When working on electrical systems, always begin
by switching off the consumer in question; otherwise, short-circuits could result.
To avoid possible injury or equipment damage when replacing bulbs, observe any instructions
provided by the bulb manufacturer.
 If the routine for changing a particular bulb
is not described here, please contact your BMW center or a workshop that works according
to BMW repair procedures with correspondingly trained personnel.
If the routine for changing a particular bulb
is not described here, please contact your BMW center or a workshop that works according
to BMW repair procedures with correspondingly trained personnel.
Light-emitting diodes installed behind translucent lenses serve as the light sources for many of the controls and displays in your vehicle. These light-emitting diodes, which operate using a concept similar to that applied in conventional lasers, are officially designated as Class 1 light-emitting diodes.
Do not remove the covers or expose the eyes
directly to the unfiltered light source for several hours; otherwise, this could
cause irritation of the retina.
In cool or humid weather, condensation may form on the interior of outside lamps. When the light is switched on, the condensation will disappear after a short time. The headlamp glasses do not need to be changed.
At high humidities, e.g. water droplets may form in the lights; have these checked by your BMW center.
Xenon lampsThese bulbs have a very long service life and are highly unlikely to fail. If a xenon lamp fails nevertheless, switch on the fog lamps and continue the journey with great care, provided that local legislation does not prohibit this.
Have any work on the xenon lamp system, including
bulb replacements, performed only by a BMW center or a workshop that works according
to BMW repair procedures with correspondingly trained personnel. Due to high voltage,
there is a risk of fatal injury if work on the xenon lamps is carried out improperly.
1. Pull the wire brackets over the notches, see arrows, and fold to the side.
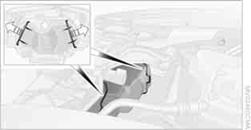
2. Fold away the headlamp cover.
Be careful when attaching the headlamp cover
and ensure that both wire brackets are securely in place; otherwise, leaks could
occur and cause damage to the headlamp system.
Attach the headlamp cover in reverse order.
Halogen headlampsHalogen low beams and high beams
H7 bulb, 55 watts
Always wear gloves and eye protection; the atmosphere
within the H7 bulb is pressurized. Otherwise, there is a risk of injury if the bulb
is damaged.
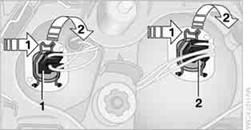
The figure shows the right-hand headlamp.
1. High beams
2. Low-beam headlamps
1. Remove the headlamp cover.
2. Disconnect the plug from the lamp.
3. Push the wire bracket to the side out of the mounting, arrow 1,
and fold it down, arrow 2.
4. Remove the bulb.
5. Insert a new bulb with the notch at the top.
6. Fold up the wire bracket and engage it.
7. Connect the plug.
8. Attach the headlamp cover.
Parking lamps, roadside parking lamps
W5W bulb, 5 watts
1. Remove the headlamp cover.

The figure shows the right-hand headlamp.
2. Pull out the bulb holder.
3. Remove and replace the bulb.
4. Reinsert the bulb holder.
5. Attach the headlamp cover.
Parking lamps, roadside parking lamps, daytime running lights
H8 bulb, 35 watts
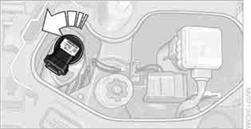
The figure shows the right-hand headlamp.
1. Remove the headlamp cover.
2. Turn the bulb, see arrow, and remove it.
3. Pull off the connector and replace the bulb.
4. Attach the connector, insert the bulb and turn it all the way in the opposite
direction.
5. Attach the headlamp cover.
Corner-illuminating lamp
H3 bulb, 55 watts
The figure shows the right-hand headlamp.
1. Remove the top headlamp cover, using the screwdriver to push the detents to one side.
2. Turn the bulb holder, see arrow, and remove it.
3. Slide the bulb out of the holder and pull off the connector.
4. Replace the bulb and attach the connector.
5. Insert the bulb holder and turn it all the way in the opposite direction.
6. Attach the headlamp cover.
PY21W bulb, 21 watts
The turn signal bulb can be changed via a cover in the wheel arch.
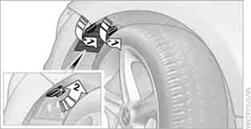
1. Turn the respective wheel inwards.
2. Using a coin, turn both locks of the cover all the way to the left, arrows
1, and remove the cover.
3. Turn the bulb holder to the left and remove it, arrow 2.
4. Apply gentle pressure to the bulb while turning it to the left for removal
and replacement.
5. Insert the bulb holder and lock it by turning it to the right.
6. Attach the cover by positioning the bottom edge first and then turning
both locks all the way to the right.
W5W bulb, 5 watts
1. Press the rear edge of the lamp toward the front with your fingertip, arrow 1and pivot it out, arrow 2.
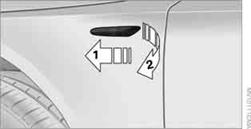
2. While simultaneously lifting the retaining tab, rotate bulb holder to
the left and remove.
3. Remove lamp and replace it.
To install, insert front end of the lamp and press into place at the back.
Tail lamps with halogen headlamps> Turn signal:
PY21W bulb, 21 watts
> Backup lamp:
W16W bulb, 16 watts
> Brake lamps:
P21W bulb, 21 watts
> Brake Force Display lamp: H21W bulb, 21 watts
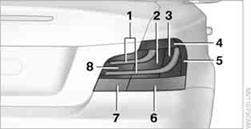
1. Inner brake lamp/tail lamp
2. Outer brake lamp/parking/tail lamp
3. Reflector
4. Lateral reflector
5. Turn signal
6. Backup lamp
7. Brake Force Display lamp/tail lamp
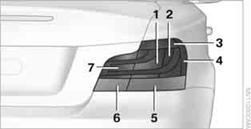
> Turn signal:
PY21W bulb, 21 watts
> Backup lamp:
W16W bulb, 16 watts
> Brake lamps:
P21W bulb, 21 watts
> Brake Force Display lamp: H21W bulb, 21 watts
1. Roadside parking lamp and tail lamp LED
2. Inner brake lamp
3. Outer brake lamp
4. Reflector
5. Lateral reflector
6. Turn signal
7. Backup lamp
8. Brake Force Display lamp
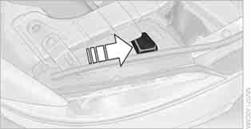
Outer brake lamp
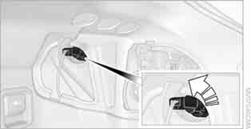
The outer brake lamp can be accessed through a single socket.
The figure shows the right side of the vehicle.
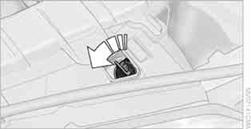
1. Remove the cover from the panel of the cargo area.
2. Turn the bulb holder to the left, see arrow, and remove it.
3. Apply gentle pressure to the bulb while turning it to the left for removal
and replacement.
4. Attach the bulb holder and turn it all the way in the opposite direction.
5. Reattach the cover.
With Xenon headlamps, the parking/tail lamp
uses LED technology. After replacing the bulb, ensure that the bulb holder is properly
seated; otherwise, the roadside parking lamp/tail lamp may not work.
Inner brake lamp, turn signal, backup lamp and Brake Force Display lamp
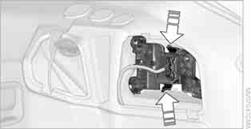
The bulbs are integrated in a single bulb holder.
1. Remove the cover from the panel of the cargo area.
2. Detach the bulb holder by pressing together the clips, see arrows, and
remove it.
3. Brake lamps and turn signal: apply gentle pressure to the bulb while turning
it to the left for removal and replacement.
4. Backup lamp: pull the bulb out of the socket and replace it.
5. Attach the bulb holder and let it snap into place.
6. Reattach the cover.
License plate lamps, center brake lamp, and parking/tail lamp
These lamps use LED technology for operation. In the event of a malfunction, please contact your BMW center or a workshop that works according to BMW repair procedures with correspondingly trained personnel.
See also:
Vehicle equipment
All standard, country-specific and optional
equipment that is offered in the model series is
described in this chapter. Therefore, equipment
is also described that is not available in a vehicle, ...
Automatic locking
The setting is stored for the remote control currently
in use.
1. "Settings"
2. "Door locks"
3. Select the desired function:
▷ "Lock if no door is opened"
T ...
Control Display
Notes
▷ To clean the Control Display, follow the care
instructions.
▷ Do not place objects close to the Control
Display; otherwise, the Control Display can
be damaged.
Switching o ...