Contacts
General information
Contacts can be created and edited. The contacts from the mobile phone are displayed as well, if this function is supported by the mobile phone. The addresses can be used as destinations for navigation and the phone numbers can be dialed.
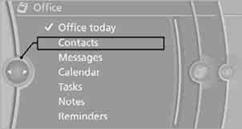
Displaying contacts1. "Office"
2. "Contacts"
All contacts are listed in alphabetical order. Depending on the number of contacts, an A-Z search is offered.
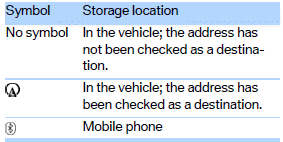
A symbol indicates the storage location of the contacts:
Dialing a phone number
1. Select the desired contact.
2. Select phone number.
The connection is established.
Editing a contact
1. Select the desired contact.

2. "Edit contact"
3. Change the entries.
4. "Store contact in vehicle"
If a contact is changed, the changes are not stored in the mobile phone. A copy of the entry is stored in the vehicle, and only this copy is displayed.
Selecting a contact as a destination
1. Select the desired contact.
2. Select address.
With contacts from the mobile phone, the address must be compared with the navigation data stored in the vehicle. In this case:
Correct the address.
3. "Start guidance" or "Add as another destination"
Checking the address as a destinationAn address that is to be used in route guidance must correspond to the navigation data stored in the vehicle. The address can be checked to ensure this.
1. Select the desired contact and highlight the address.
2. Open "Options".
3. "Check as destination"
4. Correct and store the address, if necessary. If the address is corrected
and stored, then a copy is established in the vehicle. The address is not changed
on the mobile phone.
New contact
A contact can be associated with up to 8 phone numbers, 2 addresses, 3 email addresses, and one Internet address.
1. "Office"
2. "Contacts"
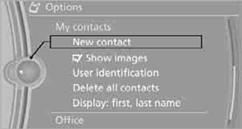
3. Open "Options".
4. "New contact"
5. If input boxes are already filled with previous entries: "Delete input
fields"
6. To fill in the entry fields: select the symbol next to the entry field.
7. Enter text and assign a contact type.
8. When equipped with a navigation system: enter address. It is only possible
to enter addresses that are contained in the navigation data stored in the vehicle.
This ensures that destination guidance is possible for all addresses.
9. "Accept address" if necessary
10. "Store contact in vehicle"
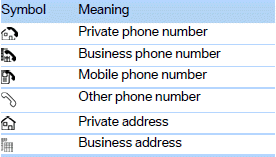
Contact types
Phone numbers and addresses can be assigned various contact types.
Defining a home address
It is possible to store a home address. It is listed at the beginning of the contacts.
1. "Home"
2. Create a contact.
3. "Store contact in vehicle"
Names can be displayed in different orders.
1. "Office"
2. "Contacts"
3. Open "Options".
4. "Display: last, first name" or "Display: first, last name"
Depending on how the contacts were stored in your mobile phone, the sorting of names can differ from the sorting selected.
Displaying contact picturesPictures stored with contacts are stored in the vehicle when the mobile phone is connected to the vehicle. The mobile phone must support this function.
1. "Office"
2. "Contacts"
3. Open "Options".
4. "Show images"
The display of all contact pictures is activated or deactivated.
Deleting contactsOnly contacts that are stored in the vehicle are deleted. The contacts on the mobile phone cannot be deleted.
1. "Office"
2. "Contacts"
3. Highlight the contact.
4. "Options"
5. "Delete contact" or "Delete all contacts".
See also:
Observe the following when
refueling
The fuel tank is full when the filler nozzle clicks
off the first time.
Handling fuels
Obey safety regulations posted at the gas
station.◀ ...
Contacts
Note
If equipped with full mobile phone preparation
package.
At a glance
Contacts can be created and edited. The contacts
from the mobile phone are displayed as
well if this function is supporte ...
Destination entry via voice
General informationFor instructions on the voice activation system.
> During the destination entry by voice, you can switch between voice entry and
entry via iDrive at any time. To do so, reacti ...