Displaying contacts
General information
1. "Office"
2. "Contacts"
All contacts are listed in alphabetical order. Depending on the number of contacts, an A-Z search is offered.
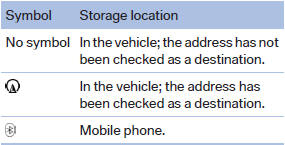
A symbol indicates the storage location of the contacts:
Dialing phone numbers
1. Select the desired contact.
2. Select the phone number.
The connection is established
Editing a contact
1. Select the desired contact.
2. "Edit contact"
3. Change the entries.
4. "Store contact in vehicle"
When a contact is edited, the changes are not stored on the mobile phone. A copy of the entry is stored in the vehicle.
Selecting the contact as a navigation destination
1. Select the desired contact.
2. Select the address.
When contacts from the mobile phone are
used, the address may need to be matched
to the navigation data contained in the vehicle.
In this case:
Correct the address.
3. "Start guidance" or "Add as another
destination"
Checking the address as a destination
An address that is to be used for destination guidance must match the navigation data contained in the vehicle. The address can be checked for this purpose.
1. Select the desired contact and highlight the
address.
2. Open "Options".
3. "Check as destination"
4. Correct and store the address if necessary.
If the address is corrected and stored, a copy of
it is stored in the vehicle. The address is not
changed on the mobile phone.
See also:
Computer
Displays in the instrument clusterCalling up information
Press the button in the turn signal/high beam lever.
The following items of information are displayed in the order listed:
> Cruising ...
Front fog lamps
The parking lamps or low beams must be
switched on.
Press the button.
The green indicator
lamp in the instrument cluster lights up.
If the automatic headlamp control, is activated, the low b ...
Convertible: rollover protection system
The rollover protection system is activated automatically in the event of an
accident, a critical driving situation, an extreme tilt in the car's longitudinal
axis or upon loss of ground conta ...