At a glance
At a glance
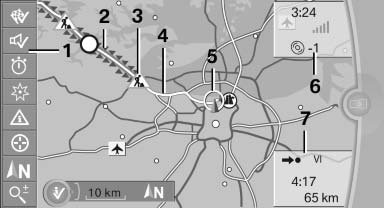
1 Function bar
2 Route section with traffic obstruction
3 Traffic sign for traffic obstruction
4 Planned route
5 Current location
6 Upper status field
7 Lower status field
Lines in the map
Streets and routes are displayed in different colors and styles depending on their classification.
Dashed lines represent railways and ferry connections.
Country borders are indicated by thin lines.
Traffic obstructions
Small triangles along the planned route indicate route sections with traffic obstructions, depending on the map scale. The direction of the triangles indicates the direction of the obstruction.
The traffic signs indicate the significance of the obstruction.
▷ Red traffic sign: the obstruction affects the
planned route or direction.
▷ Grey traffic sign: the obstruction does not
affect the planned route or direction.
Traffic bulletins
Planned route
After destination guidance is started, the planned route is displayed on the map.
Status fields
Show/hide: press the controller.
▷ Upper status field: time, telephone, and entertainment
details.
▷ Lower status field: symbol for active destination
guidance, status of traffic bulletins,
time of arrival, and distance to destination.
Function bar
The following functions are available in the function bar:
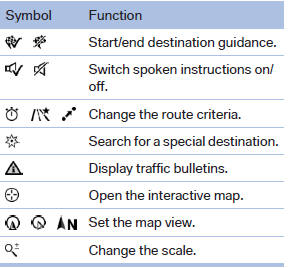
To change to the function bar, move the controller to the left.
See also:
Central locking system
The conceptThe central locking system functions when the driver's door is closed.
The system simultaneously engages and releases the locks on the following:
> Doors
> Trunk lid
> Fuel ...
The concept
DSC prevents traction loss in the driving wheels
when driving away and accelerating.
DSC also recognizes unstable vehicle conditions,
such as fishtailing or nose-diving. Subject
to physical lim ...
Status display
The current status of the Flat Tire Monitor can
be displayed on the Control Display, e.g.,
whether or not the FTM is active.
1. "Vehicle Info"
2. "Vehicle status"
3. " ...