Fuel filler flap
Opening
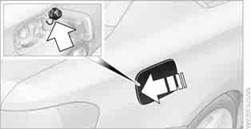
1. Open the fuel filler flap. To do so, lightly press the rear edge.
2. Turn the fuel cap counterclockwise.
3. Place the fuel cap in the bracket attached to the fuel filler flap.
Fit the cap and turn it clockwise until you clearly hear a click.
 Do not pinch the band attached to the cap; otherwise,
the cap cannot be closed properly and fuel vapors can escape. A message will be
displayed if the fuel cap is loose or missing.
Do not pinch the band attached to the cap; otherwise,
the cap cannot be closed properly and fuel vapors can escape. A message will be
displayed if the fuel cap is loose or missing.
In the event of a malfunction, you can release the fuel filler flap manually:
1. Remove the cover from the right-hand sidewall of the cargo area.
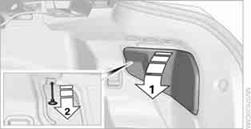
2. Pull the button with the fuel pump symbol down.
The fuel filler flap is released.
Observe the following when refueling
When handling fuels, follow the safety instructions provided at filling stations;
otherwise, there is a risk of personal injury or property damage.
When refueling, insert the filler nozzle completely into the filler pipe. Avoid lifting the filler nozzle while filling the tank, as that would lead to
> Premature pump shutoff
> Reduced efficiency of the fuel-vapor recovery system.
The fuel tank is full when the filler nozzle clicks off the first time.
Fuel tank capacityApprox. 14 US gal/53 liters, including the reserve capacity of 2.1 US gal/8 liters.
Refuel as soon as possible once your cruising
range falls below 30 miles/50 km; otherwise, engine functions are not ensured and
damage can occur.
See also:
Using the remote control
General informa
Take the remote control with you
People or animals left unattended in a
parked vehicle can lock the doors from the inside.
Always take the remote control with you
when leaving th ...
Transmitting the settings
Your personal settings can be taken with you to
another vehicle equipped with the Personal Profile
function. For more information, contact your
service center.
Transmission takes place via:
&# ...
Selecting the display
1.
Press the button.
2. "Split screen"
3. Move the controller until the split screen is
selected.
4. Press the controller or select "Split screen
content".
5. Select t ...