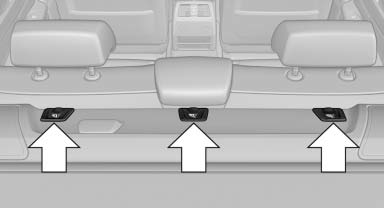
Child restraint fixing system with a tether strap
![]() LATCH mounting eyes
LATCH mounting eyes
Only use the mounting eyes for the upper LATCH retaining strap to secure child restraint fixing systems; otherwise, the mounting eyes could be damaged.
Mounting points

Depending on the vehicle equipment, there are two outer or three mounting points for child restraint fixing systems with a tether strap.
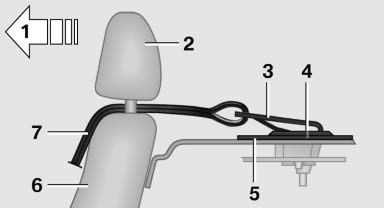
Retaining strap guide
![]() Retaining strap
Retaining strap
Make sure that the upper retaining strap is not routed over the head restraints or sharp edges and is free of twisting on its way to the upper mounting point; otherwise, the belt cannot properly secure the child restraint fixing system in an accident.

1 Direction of travel
2 Head restraint.
3 Hook for upper retaining strap
4 Mounting point/eye
5 Rear window shelf
6 Seat backrest
7 Upper retaining strap
Attaching the upper retaining strap to the mounting point
1. Remove the mounting point cover.
2. Raise the head restraint. Do not change the
middle head restraint*.
3. Guide the upper retaining strap between the
supports of the head restraint.
Guide it over the head restraint of the middle
seat.
4. Attach the hook of the retaining strap to the
mounting eye.
5. Tighten the retaining strap by pulling it
down.
6. Lower the head restraint.
See also:
General information
Antifreeze for washer fluid
Antifreeze is flammable. Therefore, keep
it away from sources of ignition.
Only keep it in the closed original container and
inaccessible to children.
Follow the in ...
Strength of the driver's and frontpassenger airbag
The strength with which the driver's and front
passenger airbags are triggered depends on the
position of the driver's and front passenger
seats.
To maintain the accuracy of this function over
...
Convertible: cargo loading
Enlarging the cargo area
When the convertible top is closed you can enlarge the cargo area:
To do so, fold the cargo area partition upward.
Before opening the convertible top, pull the cargo area p ...
